
How to Identify Sensitive Data in MS Teams and SharePoint Online
Netwrix Data Classification for SharePoint
If you have already have Netwrix Data Classification set up, skip to “Viewing Classification Results.”
Set up Netwrix Data Classification
Load a taxonomy:
- Open Netwrix Data Classification using the following link in your browser: http://localhost/conceptQS/. If you are accessing it from a server other than the one it is installed on, replace localhostwith the server address (or name).
- Click Taxonomies -> Choose Global Settings -> Click Add.
- In the Add dialog, click Load and pick a predefined taxonomy, such as PCI DSS, from the drop-down list.
- Click Add.
Set up a data source:
- Go to Sources -> General -> Add.
- In the Add dialog, choose SharePoint Online.
- Go to the Source Configuration tab and specify the following:
- Your SharePoint site URL
- The Username and Password of the tenant administrator account
- Match rules (regular expressions that control which sites to classify data on). Enter both of the following match rules. The first will include all SharePoint subsites, including MS Teams subsites, and the second will include OneDrive sites.
.*\/sites\/.*
.*\/personal\/.*
- Click Save.
Netwrix Data Classification will crawl your site, starting with URL you’ve specified, and classify data using the PCI DSS taxonomy you loaded.
Viewing Classification Results
To see the list of files that contain data regulated by PCI DSS:
- Go to Reports -> Document Reports -> Document tagging.
- Pick the PCI DSS Taxonomy.
- Click Generate.
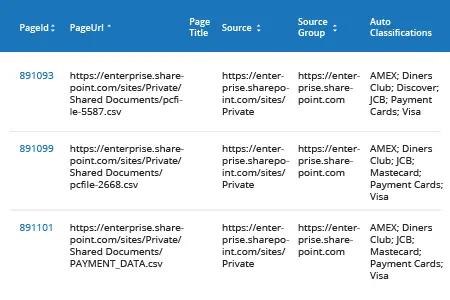
You can refine your results further by clicking Show Filters and specifying a classification term, page URL or classification score range.
Learn more about Netwrix Data Classification for SharePoint
Native Functionality
Data classification is automatic process in Microsoft 365. The platform includes a set of predefined sensitive data types that cover many common requirements. To see them, open the Microsoft 365 compliance center (https://protection.office.com/sensitiveTypes) and go to Classification -> Sensitive info types.
Adding a custom data type
The built-in data types cannot be modified, but you can create new ones from scratch:
- Click Create.
- Enter a unique Name and a Description for your custom data type and click Next.
- On the Requirements for matching page, specify the criteria for your data type. You can set up the matching element and supporting elements based on exact match with keywords, using regular expressions or using a dictionary (pre-defined set of keywords). The Confidence level setting defines the match accuracy and character proximity defines the distance between the primary pattern and the supporting evidence.
To test your new data type:
- Tick the data type in the list.
- In the side menu, click Test sensitive info types.
- Drag and drop a file, or click Browse to pick one.
- Click Test.
- When the analysis is finished, review all the matches for the data type.
Reviewing your sensitive data
Prerequisites
To account that accesses and uses data classification must have one of the following types of license:
- Microsoft 365 (E5)
- Office 365 (E5)
- Advanced Compliance (E5) add-on
- Advanced Threat Intelligence (E5) add-on
To see which data has been classified, you need to use Content Explorer. Access to Content Explorer is restricted because it lets you read the contents of scanned files; by default, even the Global Administrator does not have access to Content Explorer. To review classification results, a user must have the following permissions:
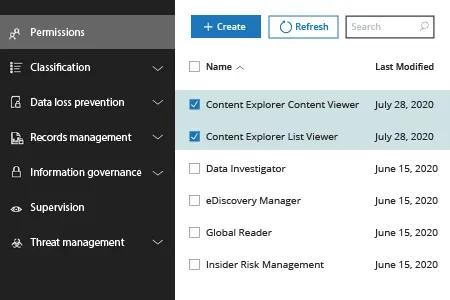
- Content Explorer List viewer — Enables the user to see each item and its location in list view.
- Content Explorer Content viewer — Enables the user to view the contents of each item in the list.
To assign these permissions to use Content Explorer:
- Open the Microsoft 365 security and compliance center (https://protection.office.com).
- Click Permissions - > Click the required permission type -> Click Edit in the Members section.
- Click Choose members -> Click Add -> Locate and tick the required user names -> Click Add -> Click Done.
Note: These permissions supercede permissions that are locally assigned to the items, which allows viewing of the content even if user doesn’t have access to their locations.
How to review classification results:
- Open the Microsoft 365 compliance center (https://compliance.microsoft.com/dataclassification).
- Go to Data Classification -> Content Explorer.
- On the left, you will see each data type found in your Microsoft 365 with its object count; on the right - the locations of that data (Exchange/SharePoint/OneDrive address). Pick a data type of interest (such as Credit Card Numbers) and then drill down into a particular location to see the classified files there.
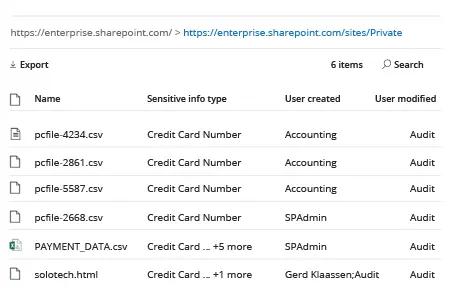
- Click on any file to review its details and content (if you have appropriate rights).
Why Choose Netwrix Data Classification
With the growing number of remote workers, organizations are relying even more heavily on Microsoft 365. It’s up to IT pros to secure all sensitive information stored there in compliance with internal security policies and external regulations. The necessary first step is to find out exactly where all important data resides and classify it according to its sensitivity and value.
While Microsoft 365 offers some data classification functionality, it has multiple drawbacks:
- It is limited to Microsoft 365, which problematic since most organizations have hybrid IT environments.
- It does not offer proper search functionality.
- It is hard to configure and maintain, and has significant (up to 24 hours) processing delay.
- It gives a lot of false positives, which require significant time and effort to reduce.
Netwrix Data Classification overcomes all these limitations. It finds and classifies sensitive data across multiple platforms, both on-premises and in the cloud. It includes multiple predefined taxonomies you can edit to meet your needs, and enables you to easily create your own taxonomies. It uses compound term processing and statistical analysis, so it works in any language or vocabulary, regardless of grammar style, and gives much more accurate results than native tools. It even includes OCR capabilities to classify data in photos and scanned images.
Share on