Native Auditing
Netwrix Auditor for Windows File Servers
Steps
- Open the PowerShell ISE.
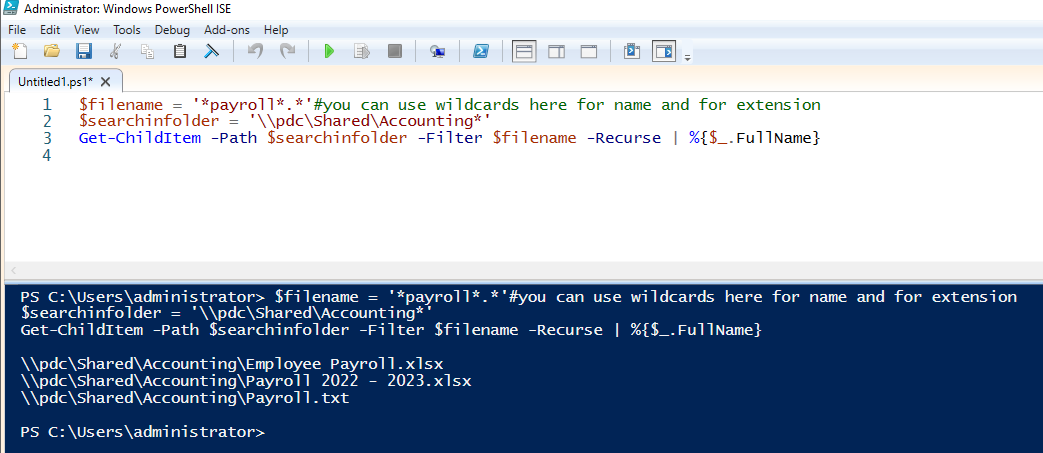
- Run a script like the following, which will return all files in the Accounting folder whose filename includes the string “payroll”:
$filename = '*payroll*.*'#you can use wildcards here for name and extension
$searchinfolder = '\\pdc\Shared\Accounting*'
Get-ChildItem -Path $searchinfolder -Filter $filename -Recurse | %{$_.FullName}
The results will show all matching files.
Once you have a list of files that might contain sensitive data, you might want to move them to a secure location. However, your processing script will terminate with an error if the file path is invalid, so before running it, you should first check for the existence of the file or folder. The following PowerShell commands will help:
- Using Get-Item to check if a file exists — You can use the Get-Item cmdlet in PowerShell to find a file by name. If the specified item path does not exist, the script will throw an error. Below is a PowerShell script that checks whether the file "Payroll 2022 - 2023.xlsx" exists using the Get-Item cmdlet. If the file exists, the script provides the file details; if not, it will display a message saying the file does not exist.
$file="C:\Shared\Accounting\Payroll 2022 - 2023.xlsx"
if (Test-Path$file) {
$item=Get-Item$file
Write-Host"The file exists. Details:"
$item
} else {
Write-Host"The file does not exist."
}

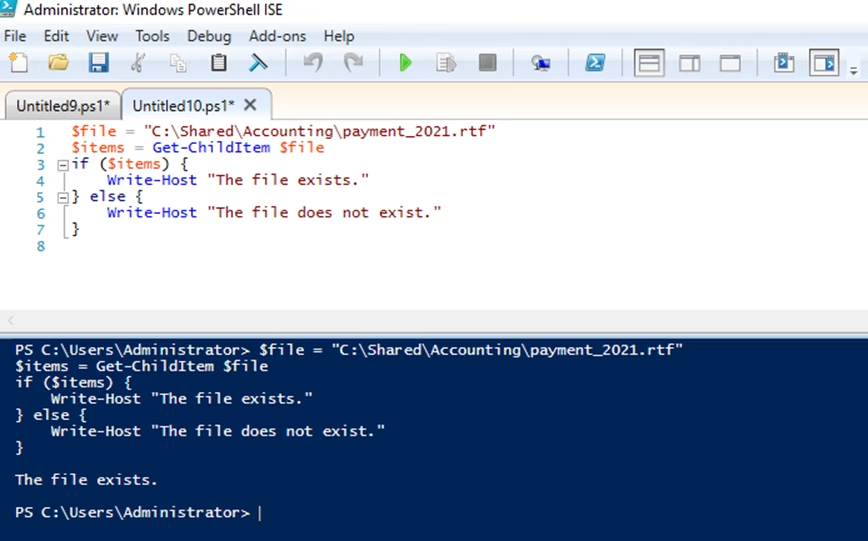
- Using Get-ChildItem to check if a file exists — The Get-ChildItem cmdlet is typically used to retrieve a list of items in a specified location, but it can also be used to check for the existence of a specific file. The script below attempts to retrieve the file "Payment_2021.rtf". If the file exists, the script will return the file details and a success message; otherwise, no output will be returned by Get-ChildItem and the write host cmdlet will display the message "The file does not exist."
$file="C:\Shared\Accounting\payment_2021.rtf"
$items=Get-ChildItem$file
if ($items) {
Write-Host"The file exists."
} else {
Write-Host"The file does not exist."
}
- Using Test-Path to check if a file exists — You can use the Test-Path cmdlet to check whether a specific file or folder exists. It returns True if the file or folder exists and False if it does not. For example, to check whether the “Payroll 2022 – 2023” file exists, run the following script:
Test-Path-Path'C:\Shared\Accounting\Payroll 2022 - 2023.xlsx'
To determine whether there are any files in C:\Shared\Accounting\ that have the .xlsx extension, run following Test-Pathcmdlet:
Test-Path-Path"C:\Shared\Accounting\*"-Include*.xlsx

You can also use Test-Path to check whether a path is a file or a directory. Add the ‑PathType with “leaf” as its value, and the cmdlet will return “true” if the path is a file.
Test-path -Path "C:\Temp\Temp*" -pathtype leaf
To validate the network path of a shared folder on a remote computer, use this cmdlet:
Test-Path -Path "\\FileServer\Backup"
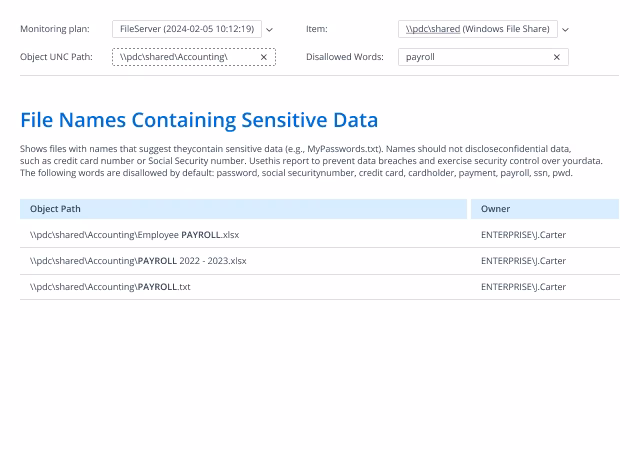
- Run Netwrix Auditor → Navigate to Reports → Open User Behavior and Blind Spot Analysis → Go to Information Disclosure → Select File Names Containing Sensitive Data → Click View.
- Specify the following filters and parameters:
- Object UNC Path — Specify the path to your file share
- Disallowed Words — Specify the string you want to search for in filenames
- Click View Report.
To save the report, click the Export button → Select a format, such as PDF → Click Save as → Choose the desired location.